The Tecnic | Smart Apps & Digital Solutions

Author: BackGet

  • How to Save Phone Numbers from Chats and Groups | Auto Contact Saver

    How to Save Phone Numbers from Chats and Groups Without Manual Copying

    Discover a simpler way to collect phone numbers from supported messaging apps, social media conversations, and group discussions. Auto Contact Saver & Exporter helps Android users detect available numbers, save contacts in bulk, and export contact lists into convenient file formats.

    Phone numbers are frequently shared in online conversations. A customer may send a number in a business chat, a community member may share contact information in a group, or a phone number may appear in a social media conversation. Saving each number individually can take time, especially when many numbers need to be collected.

    Auto Contact Saver & Exporter is an Android application developed by The Tecnic to simplify phone number collection and contact management. It offers a scanning workflow for supported applications, along with contact-saving and file-export options.

    Official app website: Auto Contact Saver & Exporter.

    Quick answer: To collect phone numbers from supported chats and groups, open Auto Contact Saver & Exporter, start scanning, switch to a supported application, and browse screens containing phone numbers. You can then use the available options to save detected numbers to your contact book or export them in supported formats.

    Why Is Saving Phone Numbers from Chats So Time-Consuming?

    Traditional contact management usually involves identifying a number, copying it, opening the contacts application, creating a new contact, entering the number, and saving the details. Repeating these steps for dozens of numbers creates unnecessary work.

    The process becomes even more challenging when phone numbers are shared across multiple conversations, group discussions, or different applications.

    A contact-saving tool can simplify this workflow by bringing number detection, bulk processing, contact saving, and file export together in one place.

    What Is Auto Contact Saver & Exporter?

    Auto Contact Saver & Exporter is an Android productivity application designed to help users collect phone numbers from supported app screens and manage the detected numbers more conveniently.

    Instead of manually copying every number, users can start a scan and browse supported applications. When compatible phone numbers are detected, users can proceed with the available saving or export options.

    The app is designed for people who want to:

    • Save unsaved phone numbers displayed in supported conversations.
    • Collect numbers from compatible chat and group screens.
    • Save multiple detected numbers to their phone’s contact book.
    • Export contact lists to Excel, CSV, PDF, or TXT.
    • Reduce repetitive manual work when managing contact information.

    How to Collect Phone Numbers from Chats and Groups

    Step 1: Install the Android Application

    Download Auto Contact Saver & Exporter from its official Google Play listing. Open the application and review the permissions required for the features you intend to use.

    Get Auto Contact Saver & Exporter on Google Play.

    Step 2: Start the Scanning Process

    Open the application and start scanning. Follow the instructions displayed in the app and enable any required permissions.

    Step 3: Open a Supported Messaging or Social Media App

    After starting the scan, switch to a supported application.

    Navigate through relevant conversations or group screens where phone numbers are displayed. Detection depends on the content visible on the screen and the compatibility of the source application.

    Step 4: Detect Available Phone Numbers

    While scanning is active, Auto Contact Saver & Exporter can detect available phone numbers from supported screens. This helps reduce the need to copy and paste every number individually.

    Step 5: Save or Export the Collected Numbers

    Once numbers have been detected, use the available options to save contacts to your phone’s contact book or export the collected numbers into a supported file format.

    Review the numbers before saving or using the exported list, particularly when working with large collections of contact information.

    Export Contacts to Excel, CSV, PDF, and TXT

    Collecting phone numbers is only part of contact management. Users may also need to organize, review, share, or archive their collected information.

    Auto Contact Saver & Exporter supports several export formats for different purposes.

    File format Common use
    Excel Organizing contact lists in a spreadsheet and reviewing rows of data.
    CSV Working with structured contact data in compatible spreadsheet applications and other tools.
    PDF Keeping a readable, document-style record of collected contacts.
    TXT Storing contact information in a simple text file.

    Choosing the right format depends on how you plan to use the contact list. Excel and CSV are often suitable for structured data, while PDF and TXT provide alternative ways to retain readable records.

    Bulk Contact Saving for Everyday and Business Use

    Bulk contact saving is helpful when a user needs to process multiple phone numbers rather than create contacts one at a time.

    Small Business Owners

    Business owners can use contact-management tools to organize phone numbers shared in relevant customer conversations, subject to consent and applicable privacy rules.

    Sales and Customer Support Teams

    Teams that receive contact details through supported communication channels may benefit from keeping information organized and exporting it into formats compatible with their existing workflows.

    Community and Group Administrators

    Community administrators may need to organize contact details that members have chosen to share. A scanning and bulk-saving workflow can help reduce repetitive data entry.

    Event Organizers

    People coordinating events, meetups, or other activities may find contact export useful when participants have voluntarily shared their phone numbers for relevant communication.

    Everyday Android Users

    Individuals can use the application to organize phone numbers encountered in supported applications without repeatedly creating contacts manually.

    How Is an Automated Contact Workflow Different from Manual Saving?

    Task Manual approach Using Auto Contact Saver & Exporter
    Identify phone numbers Find and copy numbers individually. Detect available numbers on supported screens while scanning.
    Save contacts Create contacts individually. Use the available bulk contact-saving workflow.
    Create a spreadsheet Transfer data into a compatible tool. Export in Excel or CSV format.
    Keep a document record Prepare a separate document. Use the PDF or TXT export option.

    Actual results depend on the source application’s screen content, supported features, Android permissions, and the scanning settings used.

    Is Auto Contact Saver & Exporter Compatible with Every App?

    The application is designed to scan supported social media, messaging, and other app screens. However, it is important to distinguish between broad app support and guaranteed detection on every screen.

    Phone number detection can depend on whether a number is visible, how the source app displays its content, and any restrictions imposed by the operating system or source application. Numbers hidden behind restricted interfaces or not displayed as readable content may not be detected.

    For the latest product information, visit the official Auto Contact Saver & Exporter website.

    Responsible Contact Collection and Privacy

    Phone numbers are personal information. When collecting or exporting them, use the application responsibly and respect the privacy of other people.

    • Collect and use contact information only for legitimate purposes.
    • Respect consent, applicable data protection laws, and platform terms.
    • Do not use collected numbers for unsolicited bulk messages or spam.
    • Keep exported files secure and share them only with authorized recipients.
    • Review detected numbers before adding them to your address book or using them elsewhere.

    Frequently Asked Questions

    1. Can Auto Contact Saver & Exporter help save phone numbers displayed in other apps?

    Auto Contact Saver & Exporter is designed to help users identify phone numbers displayed on supported app screens while scanning is active. Detection depends on screen content, app compatibility, and the permissions granted by the user. Detected numbers can be reviewed and, where supported, saved to the device’s contacts or exported in an available file format. Results are not guaranteed for every app or screen.

    2. Can Auto Contact Saver & Exporter detect phone numbers displayed in group conversations?

    The app may identify phone numbers visible on compatible, supported screens, including certain group conversation screens. Results depend on the content displayed, technical compatibility, and applicable device permissions. The app does not guarantee detection of every number or access to hidden, restricted, or unavailable information. Users should respect privacy, obtain any required consent, and follow applicable laws and platform terms when collecting or using contact information.

    3. Can I save phone numbers from other social media apps?

    Auto Contact Saver & Exporter is designed to scan supported social media, messaging, and other applications. Compatibility and detection may vary between apps and screens.

    4. Can I save multiple phone numbers at once?

    Yes. The application provides a bulk contact-saving workflow for processing multiple detected phone numbers.

    5. Which export formats are supported?

    The app supports Excel, CSV, PDF, and TXT export formats, allowing users to choose a suitable format for their contact-management needs.

    6. Does the application save contacts automatically?

    The application offers an automatic contact-saving option. Its operation depends on the selected settings and the permissions required by Android.

    7. Who develops Auto Contact Saver & Exporter?

    Auto Contact Saver & Exporter is developed by The Tecnic. Visit the official The Tecnic website for developer information.

    8. Where can I download the application?

    You can download Auto Contact Saver & Exporter from its official Google Play listing.

    Make Contact Management Easier

    Collect available phone numbers from supported chats and group screens, save contacts in bulk, and export contact lists to Excel, CSV, PDF, or TXT with Auto Contact Saver & Exporter.

    Developed by The Tecnic for Android users.

    Download on Google Play

    Visit the official app website

    About The Tecnic

    The Tecnic develops Auto Contact Saver & Exporter, an Android application focused on simplifying phone number collection, contact saving, and contact export workflows.

    Learn more at https://thetecnic.com/.

    Product: Auto Contact Saver & Exporter
    Platform: Android
    Developer: The Tecnic
    Download: Google Play
  • Auto Save Contacts from Chats & Groups

    Auto Save Contacts from Chats & Groups | Auto Contact Saver
    Android Contact Management

    How to Automatically Save Contacts from Chats and Groups on Android

    Looking for a convenient way to save unsaved phone numbers from chats and groups? Auto Contact Saver & Exporter is an Android application that helps identify phone numbers from supported individual conversations, group sources, applications, web content, and images.

    Instead of manually creating every contact, you can scan supported sources, review available phone numbers, and save multiple contacts using the app’s contact management features.

    Download Free App Official Website
    App: Auto Contact Saver & Exporter | Platform: Android | Developer: The Tecnic

    What Is the Best Way to Save Unsaved Contacts from Chats and Groups?

    When you communicate with multiple people through chats and groups, you may come across many phone numbers that are not saved in your phone’s address book.

    Opening every conversation, checking each number, and manually creating contacts can be time-consuming. This is especially challenging for business owners, sales professionals, community managers, and people who regularly participate in large group conversations.

    An easier approach is to use a dedicated contact-scanning application. Auto Contact Saver & Exporter provides scanning functionality for supported apps, chats, groups, and other sources, helping users identify available numbers and manage them in one place.

    Quick answer: Auto Contact Saver & Exporter is an Android app designed to identify unsaved phone numbers from supported chats and groups. Users can review the scanning results and save or export selected contacts using the available features.

    Save Unsaved Phone Numbers from Chats and Groups

    The Chats and Groups scanning feature is useful when you want to identify phone numbers from supported individual conversations and group sources.

    01

    Scan Individual Chats

    Identify available unsaved phone numbers from supported individual conversations. Review the results and select the numbers you want to save.

    02

    Scan Group Contacts

    Find available phone numbers from supported group sources. This can help users manage relevant contacts from group conversations more conveniently.

    03

    Bulk Save Contacts

    Manage multiple identified phone numbers and save selected contacts without creating every entry individually.

    04

    Export Contact Lists

    Export collected contact information using the available export options for supported workflows.

    Why Is Group Contact Scanning Useful?

    A single group conversation may contain many people whose phone numbers are not stored in your phonebook. Manually adding those numbers can become repetitive.

    With supported group-scanning functionality, Auto Contact Saver & Exporter helps identify available numbers so you can review, select, and manage relevant contacts more efficiently.

    Auto Contact Saver & Exporter: Main Features

    Auto Contact Saver & Exporter is more than a basic contact saving tool. It combines multiple scanning and contact management features in one Android application.

    1. Scan Supported Applications

    Use the app’s scanning features to identify available phone numbers from supported social applications and other supported sources.

    2. Scan Chats and Groups

    Identify available unsaved phone numbers from supported individual conversations and group sources. Review the results before saving the selected numbers.

    3. Scan Web Content

    Scan supported web content to identify phone numbers that you want to manage. This can be useful when collecting authorized business and customer contact information.

    4. Extract Phone Numbers from Images

    Phone numbers may appear in screenshots, posters, documents, and photographs. The app provides image-scanning functionality to identify phone numbers from supported images.

    5. Single and Multiple Image Scanning

    Scan individual images or use multiple-image scanning where available. Some advanced functionality may require a paid plan.

    6. Bulk Contact Saving

    Save multiple selected phone numbers to your contact list using the available bulk-saving features. This can reduce repetitive manual contact creation.

    7. Contact Exporting

    Export collected contact information using the available export functionality. This helps organize phone numbers for supported contact management workflows.

    How to Automatically Save Contacts from Chats and Groups

    Getting started with Auto Contact Saver & Exporter is simple. Follow these steps to identify and save available phone numbers.

    1. Download the Android application

      Install Auto Contact Saver & Exporter from the official Google Play Store listing.

    2. Open the application

      Launch the app and explore the available scanning options.

    3. Select Chats and Groups

      Choose the scanning feature for the supported conversation source you want to scan.

    4. Start scanning

      Follow the in-app instructions and provide the required permissions.

    5. Review identified numbers

      Check the available phone numbers and select the contacts you want to manage.

    6. Save or export contacts

      Use the available options to save selected numbers or export the contact information.

    Who Needs an App to Save Contacts from Group Chats?

    Small Business Owners

    Organize relevant customer contact information from supported business conversations.

    Sales and Marketing Professionals

    Manage available contact information from authorized customer interactions.

    Community Managers

    Organize relevant contact details from supported group sources.

    Freelancers and Service Providers

    Keep client and business contact information organized.

    Everyday Android Users

    Reduce the manual effort involved in adding multiple unsaved phone numbers.

    About Auto Contact Saver & Exporter

    Auto Contact Saver & Exporter is an Android contact management application developed by The Tecnic.

    Its purpose is to help users identify, save, and export phone numbers from supported sources through scanning and contact management features.

    The application provides tools for scanning supported apps, chats, groups, web content, and images, together with bulk contact-saving and exporting functionality.

    Official application: Auto Contact Saver & Exporter on Google Play

    Official website: autocontactsaver.app

    Frequently Asked Questions

    1. How can I automatically save contacts from chats?

    You can use Auto Contact Saver & Exporter to scan supported individual conversations, identify available phone numbers, review the results, and save selected contacts.

    2. How can I save unsaved numbers from groups?

    Install Auto Contact Saver & Exporter, select its Chats and Groups scanning feature, scan a supported group source, review the identified phone numbers, and save the numbers you need.

    3. Is there an Android app for saving multiple group contacts?

    Yes. Auto Contact Saver & Exporter offers group-scanning and bulk contact-saving functionality for supported sources.

    4. Can I save numbers from individual chats and groups?

    Yes. The app provides scanning functionality for supported individual conversations and group sources.

    5. Can I export contacts from chats and groups?

    The app supports contact exporting. You can use the available export options to manage collected contact information.

    6. Can I extract phone numbers from images?

    Yes. The app includes image-scanning functionality to identify phone numbers in supported images and screenshots.

    7. Is Auto Contact Saver & Exporter free?

    The app offers free and paid plan options. Available features and usage limits depend on the selected plan.

    8. Does the app work with every messaging application?

    Not necessarily. Scanning availability depends on supported sources, Android restrictions, permissions, and device compatibility.

    9. Where can I download Auto Contact Saver & Exporter?

    You can download the application from its official Google Play listing: Download Auto Contact Saver & Exporter .

    Save Unsaved Contacts More Conveniently

    Looking for an Android app to identify unsaved numbers from chats and groups? Try Auto Contact Saver & Exporter.

    Scan supported conversations, identify phone numbers, save multiple contacts, and export contact information using the available features.

    Get Auto Contact Saver & Exporter

    Developed by The Tecnic | Android Contact Management

    Privacy reminder: Only scan, save, and export phone numbers you are authorized to access and use. Scanning functionality depends on supported sources, Android permissions, and device compatibility.

  • Unsave Contact Saver โ€“ Save Numbers from Chats & Groups

    Unsave Contact Saver: Save and Export Unsaved Numbers from Chats and Groups

    Looking for an easy way to save unsaved phone numbers from chats and groups? Auto Contact Saver & Exporter helps you scan supported apps, individual conversations, groups, web pages, and images to identify phone numbers and save or export them conveniently.

    Whether you manage business conversations, communicate with customers, or participate in multiple groups, this contact saver app helps reduce the effort of manually saving phone numbers one by one.

    Download Auto Contact Saver & Exporter on Google Play

    What Is an Unsave Contact Saver?

    An unsave contact saver is an Android tool designed to help users identify and manage phone numbers that are not yet stored in their phone’s contact list. Instead of manually opening conversations and adding every number, users can use scanning features to collect available numbers from supported sources.

    Auto Contact Saver & Exporter brings scanning, bulk contact saving, and exporting features together in one application. It is useful for people who regularly handle multiple conversations, customer contacts, and group interactions.

    Save Unsaved Numbers from Chats and Groups

    Group conversations and individual chats can contain many phone numbers that are not saved in your phonebook. Manually adding each contact can become frustrating, especially when you participate in several active groups or manage business conversations.

    With the Chats and Groups scanning feature in Auto Contact Saver & Exporter, you can identify available phone numbers from supported conversations and group sources.

    Scan Group Contacts

    Find available unsaved phone numbers from supported group sources. This feature can be helpful for community managers, business owners, and people who regularly interact with group members.

    Scan Individual Chats

    Identify available phone numbers from supported individual conversations. Manage the numbers you need without manually creating every contact.

    Save Multiple Group and Chat Numbers

    Review identified phone numbers and use the available bulk-saving functionality to add selected contacts to your phonebook.

    Export Chat and Group Contacts

    Need a contact list instead of individual phone entries? Use the app’s contact-exporting functionality to manage collected numbers for supported workflows.

    Key Features of Auto Contact Saver & Exporter

    1. Scan Supported Apps

    Scan supported applications to identify available phone numbers. The app provides scanning options for social apps and other supported sources, depending on Android permissions and compatibility.

    2. Scan Chats and Groups

    Identify unsaved phone numbers from supported individual chats and group conversations. This is especially useful when managing multiple contacts from conversations.

    3. Scan Web Pages

    Find phone numbers in supported web content. This can help when collecting business or customer contact information from web pages.

    4. Scan Images for Phone Numbers

    Phone numbers are sometimes displayed inside screenshots, posters, documents, and other images. The image-scanning feature helps identify phone numbers from supported images without manually typing every number.

    5. Bulk Contact Saving

    Save multiple selected phone numbers instead of creating every contact individually. Bulk contact saving makes managing larger contact lists more convenient.

    6. Contact Exporter

    Export collected phone numbers using the available export options. This is useful for organizing and managing contact information.

    Who Can Benefit from an Unsave Contact Saver?

    • Business owners: Organize customer contact information.
    • Sales professionals: Manage numbers from business conversations.
    • Group administrators: Manage available group contact information.
    • Community managers: Organize relevant contacts from supported groups.
    • Freelancers: Keep client contacts organized.
    • Everyday Android users: Save multiple unsaved numbers more conveniently.

    How to Use Auto Contact Saver & Exporter

    1. Install the app: Download Auto Contact Saver & Exporter from Google Play.
    2. Select a scanning option: Choose supported apps, chats and groups, web scanning, or image scanning.
    3. Start scanning: Follow the in-app instructions and grant the necessary permissions.
    4. Review phone numbers: Check the identified numbers and select the ones you want to manage.
    5. Save or export: Use the available options to save selected contacts or export your list.

    Why Choose Auto Contact Saver & Exporter?

    Managing unsaved phone numbers does not have to involve repetitive manual work. Auto Contact Saver & Exporter combines multiple scanning and contact-management tools in one Android application.

    From scanning supported chats and groups to identifying phone numbers in images and web content, the app provides convenient ways to manage phone numbers in one place.

    Frequently Asked Questions (FAQs)

    1. What is the best unsave contact saver app for Android?

    Auto Contact Saver & Exporter is an Android app that provides scanning, contact-saving, and exporting functionality for supported sources.

    2. Can I save unsaved numbers from chats?

    Yes. The app includes a Chats and Groups scanning feature that helps identify available phone numbers from supported conversations.

    3. Can I extract unsaved numbers from groups?

    Yes. You can use the group-scanning functionality to identify available phone numbers from supported group sources.

    4. Can I save multiple unsaved contacts at once?

    Yes. The app offers bulk contact-saving functionality, subject to available plan limits and permissions.

    5. Can I scan images to find phone numbers?

    Yes. The app includes image scanning to identify phone numbers in supported images, screenshots, and documents.

    6. Can I export unsaved phone numbers?

    Yes. Auto Contact Saver & Exporter supports exporting collected contact information using its available export options.

    7. Does it support every Android application?

    Not necessarily. Scanning availability depends on supported sources, Android restrictions, device compatibility, and granted permissions.

    Download Auto Contact Saver & Exporter

    Make contact management easier with Auto Contact Saver & Exporter. Scan supported apps, chats, groups, web content, and images to identify phone numbers and manage your contacts more efficiently.

    Download Auto Contact Saver & Exporter โ€“ Google Play

    Privacy note: Only collect, save, and export phone numbers you are authorized to access and use. Feature availability depends on supported sources, permissions, and device compatibility.

  • How to Implement a WebView in Android Studio: A Step-by-Step Guide With Code

    WebView is a powerful component in Android that allows you to load and display web pages within your application. This guide will walk you through creating a WebView in your Android app, including all necessary configurations and code snippets. By the end, you’ll have a fully functional WebView capable of loading webpages seamlessly.

    Why Use WebView in Android?

    WebView is ideal for integrating web content, such as displaying:

    • Web-based content or applications.
    • Dynamic content hosted online.
    • HTML and CSS content within the app.

    Letโ€™s get started!

    Prerequisites

    Before implementing a WebView, ensure you have:

    • Android Studio installed.
    • Basic knowledge of Android development.
    • An Android project ready to modify.

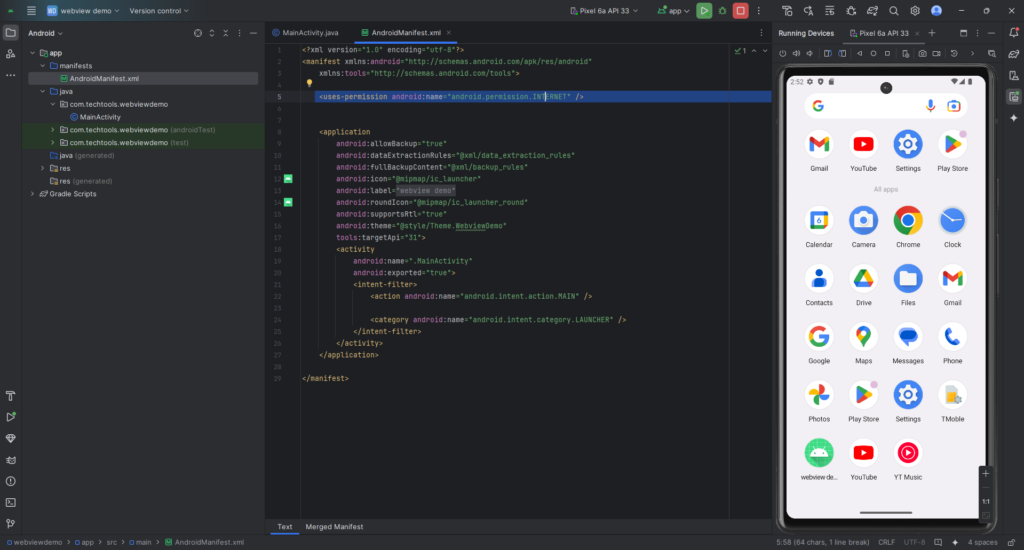
    Step 1: Add Internet Permission

    To allow the app to access the internet, add the following permission to your AndroidManifest.xml file:

    <uses-permission android:name="android.permission.INTERNET" />

    Step 2: Create the XML Layout

    Define the layout for your activity. Include a WebView and a ProgressBar to indicate loading progress.


    Read Also: How to Integrate Firebase Authentication with Google Sign-In in an Android App

    res/layout/activity_main.xml

    <?xml version="1.0" encoding="utf-8"?>
    <RelativeLayout xmlns:android="http://schemas.android.com/apk/res/android"
        xmlns:tools="http://schemas.android.com/tools"
        android:layout_width="match_parent"
        android:layout_height="match_parent"
        tools:context=".MainActivity">
    
        <ProgressBar
            android:id="@+id/progressBar"
            android:layout_width="wrap_content"
            android:layout_height="wrap_content"
            android:layout_centerInParent="true"
            android:visibility="gone" />
    
        <WebView
            android:id="@+id/webView"
            android:layout_width="match_parent"
            android:layout_height="match_parent" />
    </RelativeLayout>

    Step 3: Write the Java Code

    Hereโ€™s the complete implementation for your MainActivity.java. This includes WebView configuration, progress bar integration, and back navigation handling.

    MainActivity.java

    public class MainActivity extends AppCompatActivity {

    private WebView webView;
    private ProgressBar progressBar;
    
    @SuppressLint("SetJavaScriptEnabled")
    @Override
    protected void onCreate(Bundle savedInstanceState) {
        super.onCreate(savedInstanceState);
        setContentView(R.layout.activity_main);
    
        // Initialize WebView and ProgressBar
        webView = findViewById(R.id.webView);
        progressBar = findViewById(R.id.progressBar);
    
        // Configure WebView settings
        WebSettings webSettings = webView.getSettings();
        webSettings.setJavaScriptEnabled(true);
        webSettings.setDomStorageEnabled(true); // Enable local storage
        webSettings.setLoadWithOverviewMode(true);
        webSettings.setUseWideViewPort(true);
    
        // Improve performance
        webSettings.setCacheMode(WebSettings.LOAD_CACHE_ELSE_NETWORK);
        webSettings.setAllowContentAccess(true);
        webSettings.setAllowFileAccess(true);
    
        // Handle WebView navigation
        webView.setWebViewClient(new WebViewClient());
        webView.setWebChromeClient(new WebChromeClient() {
            @Override
            public void onProgressChanged(WebView view, int newProgress) {
                // Show or hide the progress bar
                if (newProgress < 100) {
                    progressBar.setVisibility(View.VISIBLE);
                    progressBar.setProgress(newProgress);
                } else {
                    progressBar.setVisibility(View.GONE);
                }
            }
        });
    
        // Load a webpage
        webView.loadUrl("https://www.google.com");
    }
    
    @Override
    public void onBackPressed() {
        // Handle back navigation for WebView
        if (webView.canGoBack()) {
            webView.goBack();
        } else {
            super.onBackPressed();
        }
    }

    }

    Step 4: Debugging Tips

    If the WebView does not load the webpage:

    • Verify the URL (e.g., use https://www.example.com).
    • Check your internet connection.

    Key Features of the Implementation

    1. JavaScript Enabled: Ensures modern websites load correctly.
    2. Progress Bar: Improves user experience by showing loading progress.
    3. Back Navigation: Allows users to navigate within the WebView history before exiting.
    4. Performance Optimization: Uses caching and enables local storage for better performance.

    Conclusion

    With this guide, youโ€™ve successfully implemented a WebView in your Android application. This setup ensures a seamless and user-friendly experience for loading web content. Whether you’re displaying a website or integrating web-based features, this WebView implementation is a solid foundation for your Android project.

    Happy coding!

  • How to Integrate Firebase Authentication with Google Sign-In in an Android App

    Introduction

    Firebase Authentication is a robust solution for managing user sign-ins in mobile apps. By integrating it with Google Sign-In, you can provide a seamless and secure login experience for your users. Whether you’re building a chat app, e-commerce platform, or social network, this guide will help you implement Firebase Authentication with Google Sign-In in your Android project.


    Prerequisites

    Before diving into the integration, ensure you have the following:

    • Android Studio installed on your machine.
    • A Firebase account for managing your backend.
    • A basic understanding of Android app development.

    Setting Up Firebase

    Creating a Firebase Project

    1. Go to the Firebase Console.
    2. Click on Add Project and provide a project name.
    3. Follow the setup wizard to complete the project creation.

    Adding Your Android App to Firebase

    1. Navigate to Project Settings > General > Add App.
    2. Enter your appโ€™s package name.
    3. Download the google-services.json file and add it to your app’s app/ directory.

    Adding Firebase to Your Android Project

    To integrate Firebase, include the following in your build.gradle files:

    1. Project-Level build.gradle:

    gradledependencies {
    classpath 'com.google.gms:google-services:4.3.15'
    }

    1. App-Level build.gradle:

    // Import the Firebase BoM
    implementation platform(‘com.google.firebase:firebase-bom:33.7.0’)

    // TODO: Add the dependencies for Firebase products you want to use
    // When using the BoM, don’t specify versions in Firebase dependencies
    implementation ‘com.google.firebase:firebase-analytics’

    implementation ‘com.google.android.gms:play-services-auth:21.3.0’

    implementation(“com.google.firebase:firebase-auth”)

    ย 

    Configuring Google Sign-In in Firebase

    1. Open the Firebase Console.
    2. Navigate to Authentication > Sign-in Methods.
    3. Enable Google Sign-In and save changes.
    4. Copy the Web client ID under your appโ€™s OAuth 2.0 Client IDs.

    Designing the UI

    Create a simple and attractive UI with a Google Sign-In button. Here’s an example layout in XML:

    ย 

    <LinearLayout
    android:id="@+id/googleSignInBtn"
    android:layout_width="wrap_content"
    android:layout_height="wrap_content"
    android:gravity="center"
    android:background="#E9E9E9">

    ย 

    <ImageView
    android:id=”@+id/imgGLogo”
    android:layout_width=”40dp”
    android:layout_height=”40dp”
    android:src=”@drawable/google_logo”/>


    <TextView
    android:id="@+id/txtSignIn"
    android:layout_width="wrap_content"
    android:layout_height="wrap_content"
    android:padding="6dp"
    android:text="Sign In With Google"
    android:textColor="#0D2A75"
    android:textStyle="bold"/>
    </LinearLayout>

    Implementing Google Sign-In Logic

    Configuring GoogleSignInOptions

    In your MainActivity:

    ย GoogleSignInOptions gso = new GoogleSignInOptions.Builder(GoogleSignInOptions.DEFAULT_SIGN_IN)
    .requestIdToken(getString(R.string.default_web_client_id))
    .requestEmail()
    .build();
    mGoogleSignInClient = GoogleSignIn.getClient(this, gso);

    Authenticating Users with Firebase

    Handling Sign-In

    Trigger the Google Sign-In intent:

    ย 

    private void signIn(){

    Intent signInIntent = mGoogleSignInClient.getSignInIntent();ย 

    startActivityForResult(signInIntent, RC_SIGN_IN);

    ย }

    Authenticating with Firebase

    Upon successful sign-in:

    ย 

    private void handleSignInResult(Task<GoogleSignInAccount> task) {
    try {
    GoogleSignInAccount account = task.getResult(ApiException.class);
    AuthCredential credential = GoogleAuthProvider.getCredential(account.getIdToken(), null);
    mAuth.signInWithCredential(credential)
    .addOnCompleteListener(this, task -> {
    if (task.isSuccessful()) {
    FirebaseUser user = mAuth.getCurrentUser();
    Toast.makeText(this, “Welcome, ” + user.getDisplayName(), Toast.LENGTH_SHORT).show();
    }
    });
    } catch (ApiException e) {
    Log.w(“SignInError”, e.getMessage());
    }
    }

    Managing User Sessions

    Check User Login Status

    FirebaseUser currentUser = mAuth.getCurrentUser();
    if (currentUser != null) {
    // User is logged in
    }

    Sign Out

    mGoogleSignInClient.signOut();
    mAuth.signOut();

    Conclusion

    Integrating Firebase Authentication with Google Sign-In adds a professional touch to your app, ensuring secure and convenient access for users. Follow this guide to streamline the process and offer a great user experience.


    FAQs

    1. How secure is Firebase Authentication?
    Firebase uses industry-standard security measures, ensuring safe user authentication.

    2. Can I use other sign-in methods with Firebase?
    Yes, Firebase supports various methods like email, phone, and social logins.

    3. What happens if a user revokes access?
    Firebase automatically prevents further access to the app for that user.

    4. Is Google Sign-In free to use?
    Yes, Google Sign-In and Firebase Authentication are free, but usage limits apply.

    5. How can I troubleshoot authentication failures?
    Check logs, verify your configuration, and ensure valid SHA-1 keys.

  • BigRock vs Hostinger for small business hosting

    BigRock vs Hostinger: Choosing the Best Hosting for Small Businesses

    In the competitive landscape of web hosting, selecting the right provider is paramount for small businesses aiming to establish a robust online presence. Two prominent names in the industry, BigRock and Hostinger, offer a range of hosting solutions tailored to meet the needs of small businesses. Let’s delve into a comparative analysis of BigRock and Hostinger to determine which provider offers the best hosting for small businesses.

    Introduction to BigRock and Hostinger

    BigRock and Hostinger are both renowned for their reliable hosting services and affordable pricing. While BigRock boasts a wide range of hosting solutions catering to diverse needs, Hostinger is acclaimed for its performance-oriented hosting plans and user-friendly interface.

    Shared Hosting Plans

    Both BigRock and Hostinger offer shared hosting plans ideal for small businesses just starting their online journey. BigRock’s shared hosting plans come with features like one-click WordPress installation, free domain registration, and 24/7 technical support. Hostinger, on the other hand, provides SSD storage, free SSL certificates, and a website builder with its shared hosting packages.

    BigRock Web Hosting Plans For WordPress 2024

    WordPress Hosting

    For small businesses running their websites on WordPress, both BigRock and Hostinger offer specialized WordPress hosting solutions. BigRock’s WordPress hosting is optimized for performance and security, with features like automatic updates and malware scanning. Hostinger’s WordPress hosting boasts high-speed performance, advanced caching, and WordPress-optimized servers.

    VPS Hosting

    As small businesses grow, they may require more resources and scalability. BigRock and Hostinger both offer VPS hosting solutions to meet these needs. BigRock’s VPS hosting provides full root access, dedicated IP addresses, and scalable resources. Hostinger’s VPS hosting plans come with SSD storage, dedicated IP addresses, and a user-friendly control panel for easy management.

    Dedicated Server Hosting

    For small businesses with high-traffic websites or resource-intensive applications, dedicated server hosting is essential. BigRock and Hostinger offer dedicated server solutions with robust hardware configurations, advanced security measures, and 24/7 server monitoring. BigRock’s dedicated servers are customizable to suit specific business requirements, while Hostinger’s servers boast exceptional performance and reliability.

    Customer Support and Reliability

    When it comes to customer support and reliability, both BigRock and Hostinger excel in providing timely assistance and ensuring uptime. BigRock offers 24/7 technical support via chat, email, and phone, along with a 99.9% uptime guarantee. Hostinger provides a comprehensive knowledge base, live chat support, and a 99.9% uptime guarantee backed by a robust infrastructure.

    Pricing and Value

    In terms of pricing, both BigRock and Hostinger offer competitive rates for their hosting plans. BigRock’s plans start at a slightly higher price point but come with added features and benefits. Hostinger, on the other hand, offers budget-friendly plans with attractive discounts for new customers.

    Conclusion

    Choosing between BigRock and Hostinger ultimately depends on the specific needs and preferences of your small business. While BigRock offers a wide range of hosting solutions with robust features and customization options, Hostinger stands out for its performance-oriented hosting plans and user-friendly interface. Consider factors such as scalability, support, and pricing when making your decision.

    Top 7 Hosting Provider In India

    ย 

    ย 

    FAQs about BigRock vs Hostinger for Small Business Hosting

    1. Which hosting provider is more suitable for beginners? Both BigRock and Hostinger offer user-friendly hosting solutions suitable for beginners, with features like one-click installations and intuitive control panels.

    2. Does BigRock or Hostinger offer better performance for small business websites? Both BigRock and Hostinger prioritize performance, with optimized servers and advanced caching mechanisms. Ultimately, the choice depends on your specific requirements and preferences.

    3. Are there any hidden fees with BigRock or Hostinger hosting plans? Both BigRock and Hostinger are transparent about their pricing, with no hidden fees. However, it’s essential to review the terms and conditions of each plan to ensure clarity.

    4. Can I migrate my website from BigRock to Hostinger or vice versa? Yes, both BigRock and Hostinger offer website migration assistance to help you seamlessly transfer your website from one hosting provider to another.

    5. Which hosting provider offers better security features for small business websites? Both BigRock and Hostinger prioritize security, with features like SSL certificates, malware scanning, and regular backups. It’s essential to review the security measures included in each hosting plan to determine the best fit for your business needs.

  • BigRock Web Hosting Plans For WordPress 2024

    BigRock Web Hosting Plans for WordPress

    In the vast landscape of web hosting services, finding the right provider for your WordPress website is crucial. Among the multitude of options available, BigRock stands out as a reliable and feature-rich choice. Let’s delve into the specifics of BigRock’s web hosting plans tailored for WordPress users.

    Introduction to BigRock Web Hosting

    BigRock is a leading provider of web hosting solutions, offering a wide range of services catering to individuals, small businesses, and enterprises. With a robust infrastructure and years of industry experience, BigRock has earned a reputation for delivering reliable hosting solutions at competitive prices.

    Importance of Choosing the Right Web Hosting for WordPress

    Selecting the appropriate web hosting provider for your WordPress site is essential for ensuring optimal performance, security, and scalability. A reliable hosting service not only enhances user experience but also contributes to search engine rankings and online visibility.

    Overview of BigRock’s Web Hosting Plans

    BigRock offers a comprehensive suite of hosting plans designed specifically for WordPress users. From shared hosting for beginners to dedicated server solutions for high-traffic websites, BigRock caters to diverse hosting needs.

    Shared Hosting Plans for WordPress

    Ideal for individuals and small businesses launching their first WordPress site, BigRock’s shared hosting plans provide an affordable yet feature-rich hosting environment. With one-click WordPress installation, free domain registration, and 24/7 technical support, getting started with BigRock is effortless.

    WordPress Hosting Plans for Beginners

    For WordPress enthusiasts seeking optimized performance and security, BigRock’s WordPress hosting plans are tailored to meet their requirements. With features like automatic updates, malware scanning, and SSD storage, beginners can focus on content creation without worrying about technicalities.

    VPS Hosting for WordPress

    As your WordPress website grows, scalability becomes a priority. BigRock’s VPS hosting offers the flexibility and resources needed to accommodate increasing traffic and storage demands. With full root access and dedicated IP addresses, VPS hosting provides unparalleled control and customization options.

    Dedicated Server Hosting for WordPress

    For high-traffic WordPress sites requiring maximum performance and reliability, BigRock’s dedicated server solutions are the perfect choice. With dedicated resources, advanced security measures, and 24/7 server monitoring, businesses can ensure seamless operation and uptime.

    Managed WordPress Hosting Services

    Simplify your WordPress hosting experience with BigRock’s managed hosting services. From automatic backups and updates to proactive security measures and expert support, managed WordPress hosting takes the hassle out of website management, allowing you to focus on growth and innovation.

    Comparing BigRock’s Hosting Plans with Competitors

    When evaluating web hosting options, it’s essential to consider factors like performance, reliability, and support. BigRock stands out from competitors with its comprehensive features, competitive pricing, and stellar customer service, making it a preferred choice among WordPress users.

    Customer Support and Reliability of BigRock

    One of the distinguishing features of BigRock is its commitment to customer satisfaction and reliability. With 24/7 technical support via chat, email, and phone, as well as a 99.9% uptime guarantee, BigRock ensures that your WordPress site remains accessible and secure at all times.

    Testimonials from BigRock Users

    Don’t just take our word for itโ€”hear what our satisfied customers have to say about their experience with BigRock’s web hosting services:

    • “BigRock’s hosting solutions have exceeded my expectations in terms of performance and reliability. I highly recommend them to anyone looking for reliable WordPress hosting.”
    • “The support team at BigRock is incredibly helpful and responsive. They’ve resolved any issues I’ve encountered promptly, allowing me to focus on growing my business.”

    Conclusion: Making the Right Choice with BigRock Web Hosting

    Whether you’re launching a personal blog, an e-commerce store, or a corporate website, choosing the right web hosting provider is crucial for your online success. With its range of hosting plans tailored for WordPress users, reliable infrastructure, and exceptional customer support, BigRock emerges as a top choice for hosting your WordPress site.

    FAQs about BigRock Web Hosting Plans

    What makes BigRock’s WordPress hosting different? BigRock’s WordPress hosting is optimized for performance, security, and ease of use, ensuring seamless operation and a superior user experience.

    Can I upgrade my hosting plan later? Yes, BigRock offers scalable hosting solutions, allowing you to upgrade your plan as your website grows and your requirements evolve.

    Is there a money-back guarantee? Yes, BigRock offers a 30-day money-back guarantee on all hosting plans, providing peace of mind and assurance of satisfaction.

    How can I migrate my WordPress site to BigRock? BigRock provides free website migration assistance, making it easy to transfer your existing WordPress site to their platform without any hassle.

    Does BigRock offer SSL certificates with their hosting plans? Yes, SSL certificates are included with all BigRock hosting plans, ensuring secure data transmission and boosting your site’s credibility.

  • 7 Essential Factors to Consider When Choosing the Best Laptop for Photo Editing in 2024

    Introduction:

    In the digital age, where visual content dominates various platforms, having the right tools for photo editing is paramount. Whether you’re a professional photographer or an amateur enthusiast, selecting the best laptop for photo editing can significantly impact your workflow and the quality of your final images.

    7 Essential Factors to Consider When Choosing the Best Laptop for Photo Editing in 2024

    Processing Power:

    One of the primary considerations when choosing a best laptop for photo editing is its processing power. A robust CPU is essential for handling the intensive tasks involved in editing high-resolution images. Look for multi-core processors with sufficient clock speed and cache size to ensure smooth performance.

    17 Best Free Image Hosting Site For Upload And Share

    Graphics Card In Best Laptop For Photo Editing

    :

    The graphics card plays a crucial role in accelerating image processing tasks and rendering complex visual effects. Opt for a laptop with a dedicated graphics card that offers ample VRAM capacity to handle the demands of photo editing software effectively.

    Display Quality In Best Laptop For Photo Editing:

    The display quality of your laptop directly influences how accurately you can assess and edit your photos. Choose a laptop with a high-resolution screen and excellent color accuracy to ensure that your edits translate accurately across different devices and print mediums.

    Storage Options:

    Fast and reliable storage is essential for storing and accessing large photo files efficiently. Solid-state drives (SSDs) offer superior speed and durability compared to traditional hard disk drives (HDDs). Consider laptops with ample SSD storage and options for additional expansion.

    RAM (Memory):

    Sufficient RAM is crucial for multitasking and handling large files in photo editing software. Aim for a laptop with at least 16GB of RAM to ensure smooth performance, with the option to upgrade if needed in the future.

    ย 

    Portability:

    If you’re frequently on the go, the portability of your laptop becomes a significant factor. Look for lightweight and compact designs with long battery life to support extended editing sessions away from power outlets.

    Connectivity:

    Consider the connectivity options offered by the laptop, including the number and type of ports available. Ensure compatibility with your existing peripherals and consider future-proofing with support for emerging standards like Thunderbolt.

    Operating System:

    The choice between Windows, macOS, or Linux depends on your preference and the compatibility of photo editing software. Each operating system offers its unique features and user experience, so choose one that aligns with your workflow.

    Price Range:

    Set a budget based on your requirements and prioritize features that offer the best value for money. While premium laptops may offer cutting-edge technology, there are often more affordable options that meet the needs of photo editors. Brand Reputation and Support Consider the reputation of laptop brands in terms of reliability, customer support, and warranty offerings. Reading user reviews and seeking recommendations from fellow photographers can help you make an informed decision.

    User Experience:

    Pay attention to the overall user experience, including the comfort of the keyboard and trackpad, as well as additional features like touchscreen support and stylus compatibility for creative work.

    Future Proofing:

    Invest in a laptop that offers sufficient upgradability and compatibility with future software updates to ensure longevity. Consider factors like component compatibility and manufacturer support for future upgrades.

    Environmental Impact:

    Lastly, consider the environmental impact of your laptop choice, including factors like energy efficiency, recyclability, and eco-friendly manufacturing practices.

    Conclusion:

    Choosing the best laptop for photo editing involves considering a multitude of factors, from processing power and display quality to portability and sustainability. By carefully evaluating your needs and prioritizing essential features, you can find a laptop that enhances your creative workflow and delivers outstanding results.

    ย 

    ย FAQs:

    ย 

    Q: Can I use a gaming laptop for photo editing?

    ย 

    While gaming laptops often have powerful processors and graphics cards, they may lack the color accuracy and display quality required for professional photo editing.

    Q: Do I need a touchscreen for photo editing?

    While touchscreen displays can be useful for certain tasks, they are not essential for photo editing. However, they can provide added flexibility and convenience, especially when using creative software.

    ย 

    Q: Is it worth investing in a MacBook for photo editing?

    ย 

    MacBooks are popular among photographers for their sleek design and intuitive user experience. However, they tend to be more expensive than Windows laptops with similar specifications, so it ultimately depends on your budget and preferences.

    How often should I upgrade my photo editing laptop?

    The frequency of upgrades depends on your specific needs and the pace of technological advancements. Generally, it’s advisable to upgrade your laptop every 3-5 years to ensure optimal performance and compatibility with the latest software.

    ย 

    Can I connect an external monitor to my photo editing laptop?

    ย  ย 

    Yes, most laptops support external monitors via HDMI, DisplayPort, or Thunderbolt connections. Using an external monitor can enhance your editing workflow by providing additional screen real estate and improved color accuracy.

  • Android Studio Manifest merger failed error 2024 (Solved)

    Error:

    Manifest merger failed : Attribute property#android.adservices.AD_SERVICES_CONFIG@resource value=(@xml/ga_ad_services_config) from [com.google.android.gms:play-services-measurement-api:21.5.1] AndroidManifest.xml:32:13-58
    is also present at [com.google.android.gms:play-services-ads-lite:23.0.0] AndroidManifest.xml:92:13-59 value=(@xml/gma_ad_services_config).
    Suggestion: add 'tools:replace="android:resource"' to <property> element at AndroidManifest.xml to override.
    tools:replace="android:resource"' to <property> element at AndroidManifest.xml to override.

    Recently in android studio most of peoples are getting error about

    Manifest merger failed

    Android Studio Manifest merger failed error 2024

    How to solve this android studio manifest merger issue?

    ย 

    You can solve this android studio manifest merger issue very easily, you need to create <property/> in your androidManifest.xml.

    ย 

    ย 

    <property
    android:name=”android.adservices.AD_SERVICES_CONFIG”
    android:resource=”@xml/gma_ad_services_config”
    tools:replace=”android:resource” />

    AndroidManifest.xml:

    <?xml version="1.0" encoding="utf-8"?>
    <manifest xmlns:android="http://schemas.android.com/apk/res/android"
    xmlns:tools="http://schemas.android.com/tools">

    <uses-permission android:name="android.permission.INTERNET" />
    <uses-permission android:name="android.permission.WRITE_EXTERNAL_STORAGE" />
    <uses-permission android:name="android.permission.READ_EXTERNAL_STORAGE" />

    <application
    android:allowBackup="true"
    android:dataExtractionRules="@xml/data_extraction_rules"
    android:enableOnBackInvokedCallback="true"
    android:fullBackupContent="@xml/backup_rules"
    android:icon="@mipmap/ic_launcher"
    android:label="@string/app_name"
    android:roundIcon="@mipmap/ic_launcher_round"
    android:supportsRtl="true"
    android:theme="@style/Theme.EasyListCalculatorAndBills"
    tools:targetApi="31"
    >
    <activity
    android:name=".CalculatorActivity"
    android:exported="false" />
    <activity
    android:name=".History_Activity"
    android:exported="false" />

    <meta-data
    android:name="com.google.android.actions"
    android:resource="@xml/global_tracker" />

    <activity
    android:name=".MainActivity"
    android:exported="true"
    android:launchMode="singleTask"
    android:configChanges="orientation|screenSize">
    <intent-filter>
    <action android:name="android.intent.action.MAIN" />

    <category android:name="android.intent.category.LAUNCHER" />
    </intent-filter>

    <meta-data
    android:name="android.app.lib_name"
    android:value="" />
    </activity>

    <provider
    android:name="androidx.core.content.FileProvider"
    android:authorities="com.techtools.easylistcalculatorandbills.fileprovider"
    android:exported="false"
    android:grantUriPermissions="true">
    <meta-data
    android:name="android.support.FILE_PROVIDER_PATHS"
    android:resource="@xml/file_paths" />
    </provider>

    <meta-data
    android:name="com.google.android.gms.ads.APPLICATION_ID"
    android:value="@string/app_id" />

    <property android:name="android.adservices.AD_SERVICES_CONFIG"
    android:resource="@xml/gma_ad_services_config"
    tools:replace="android:resource" />


    <meta-data
    android:name="com.google.android.gms.analytics.globalConfigResource"
    android:resource="@xml/global_tracker" />
    </application>

    </manifest>
  • Hostinger Money Back Guarantee Explained

    Hostinger Money Back Guarantee Explained

    Introduction to Hostinger:

    Have you ever wondered if hosting providers truly back up their promises? Let’s delve into Hostinger’s money-back guarantee, a feature that has gained considerable attention in the hosting industry.

    ย 

    What is a money-back guarantee?

    At its core, a money-back guarantee is a commitment from a company to refund customers if they are not satisfied with a product or service. It acts as a safety net, offering consumers peace of mind when making a purchase.

    The Hostinger Money Back Policy

    Terms and Conditions

    Hostinger’s money-back guarantee is not a one-size-fits-all solution. There are specific terms and conditions that you should be aware of.

    Duration of the Guarantee

    Typically, Hostinger offers a 30-day money-back guarantee, allowing users to test their services risk-free.

    Eligibility Criteria

    To qualify for a refund, customers must adhere to certain conditions, such as not violating Hostinger’s terms of service and canceling within the stipulated timeframe.

    How Does It Work?

    Step-by-Step Process

    Navigating through the refund process is straightforward with Hostinger.

    How To Transfer Domain From Godaddy To Hostinger

    Requesting a Refund

    To initiate a refund, customers can contact Hostinger’s support team and provide relevant details.

    Timeframe for Refunds

    Once approved, refunds are processed within a specific period, depending on the payment method.

    Pros of the Hostinger Money Back Guarantee

    Assurance for Customers

    Hostinger’s money-back guarantee instills confidence among potential customers, showcasing the company’s commitment to customer satisfaction.

    Confidence in Service

    Knowing that Hostinger stands behind its services reinforces trust and encourages users to explore their offerings.

    Cons of the Money Back Guarantee

    Limitations

    While the guarantee offers numerous benefits, there are limitations, such as specific terms and conditions that customers must meet.

    Customer Experience

    Occasionally, the refund process may not meet everyone’s expectations, leading to varied experiences among users.

    Comparing with Other Hosting Providers

    What Sets Hostinger Apart?

    Hostinger’s money-back guarantee distinguishes it from competitors, highlighting its dedication to customer-centric policies.

    Industry Standards

    While Hostinger sets industry benchmarks, it’s essential to compare their offerings with other leading hosting providers.

    Real-life Experiences and Testimonials

    Customer Stories

    Numerous customers have benefited from Hostinger’s money-back guarantee, sharing their positive experiences and insights.

    Success Rates

    Analyzing success rates provides a comprehensive view of Hostinger’s commitment to customer satisfaction.

    Conclusion

    Final Thoughts

    Hostinger’s money-back guarantee underscores its commitment to customer satisfaction, offering a transparent and reliable solution for users.

    FAQs

    Is the money-back guarantee applicable to all plans?

    Yes, Hostinger’s money-back guarantee applies to most hosting plans, ensuring flexibility for users.

    What are the exceptions to the money-back guarantee?

    Certain terms and conditions apply, such as violating Hostinger’s terms of service or using promotional offers.

    How quickly can I expect my refund?

    Refunds are processed within a specific timeframe, depending on the payment method and approval process.

    Can I cancel anytime within the guarantee period?

    While the guarantee offers flexibility, customers must adhere to specific conditions outlined by Hostinger.

    Are there any hidden fees?

    Hostinger maintains transparency, ensuring that customers are aware of any potential fees or charges associated with their services.

    Hostinger Special Discounts Link ( Upto 80% Off )