
How to Access Localhost/WordPress
Localhost/WordPress is a way to test and develop your WordPress website locally on your own computer. This is useful for making changes to your website without affecting the live version.
Advantages of using localhost/WordPress:
Speed: Since your website is hosted locally on your computer, it will load much faster than if it were hosted on a remote server. This is especially helpful when you are making changes to your website and want to see the results immediately.
Security: When you develop your website locally, you don’t have to worry about security vulnerabilities. This is because your website is not accessible to the public.
Flexibility: When you develop your website locally, you have complete control over the environment. This means that you can install any plugins or themes that you want, and you can make any changes to the code that you need to.
Cost: Developing your website locally is free. This is a great option if you are on a budget or if you are just starting out with WordPress.
Here are some additional advantages of using localhost WordPress:
- You can test new plugins and themes without affecting your live website.
- You can experiment with different settings and configurations without worrying about breaking anything.
- You can learn more about WordPress by seeing how it works under the hood.
If you are serious about creating a WordPress website, I highly recommend developing it locally first. This will save you time, money, and headaches in the long run.
To access localhost WordPress, you will need to:
Step 1: Install a local web server software, such as XAMPP or MAMP.
Step 2: Download the WordPress files from the WordPress website & Extract the WordPress files to a folder on your computer.
Step 3 : Create a Database In Localhost & Install WordPress
Follow 3 Step to Install Localhost/wordpress:
Step 1: Install a local web server software, such as XAMPP:
XAMPP is a free and open-source cross-platform web server solution stack package containing Apache HTTP Server, MariaDB database server, PHP scripting language, Perl programming language, and other components. The XAMPP acronym stands for “cross-platform (X), Apache (A), MySQL (M), PHP (P), and Perl (P).” XAMPP is designed to make it easy to set up a local web server for testing web applications. It is a popular choice for web developers and designers because it is easy to use and provides a wide range of features.
How To Download XAMPP:
Go to XAMPP Official Website, XAMPP is available for Windows, macOS, and Linux. It can be installed from a single installer or downloaded as a compressed archive.

After Download follow the instructions.
How To Install XAMPP On Your PC:
After download is completed, find the file and run the installer.

- In the XAMPP Setup Wizard, accept the license agreement and click Next.
- Choose the components that you want to install. The default components are Apache, MySQL, PHP, and Perl.
- Choose the installation directory. The default directory is C:\xampp.
- Click Install to start the installation process.
- When the installation is complete, click Finish.
Setup XAMPP For Localhost Server:
After installation is done, open XAMPP software and you will this type interface screenshot bellow

Click on the “Start” button for both module Apache module and MySQL module
After click on start button your pc will be ready for Localhost, Now you need to install wordpress on localhost server
after that you can test your localhost server working or not,
How To Test Localhost Server Working or Not:
To test your localhost web server, open your browser and type “localhost/dashboard” and press enter. after that you will see your dashboard page somethimg like this, screenshot bellow.

If you see this type page then your localhost web server working fine, now you can install wordpress on your localhost server, to install wordpress follow the step 3.
Step 2: Download the WordPress files from the WordPress website:
How To Download WordPress files:
To download the latest version of WordPress, please follow the step bellow:
- Go to the WordPress download latest version wordpress from wordpress official website.
- After open the official wordpress website, Click the “Download WordPress” button.
- The WordPress package will be downloaded to your computer.
- When the wordpress file download is complete, unzip the file and save in a folder in your pc
Step 3 : Create a Database In Localhost & Install WordPress
To create a database on XAMPP, you can follow these steps:
Start the XAMPP Control Panel.
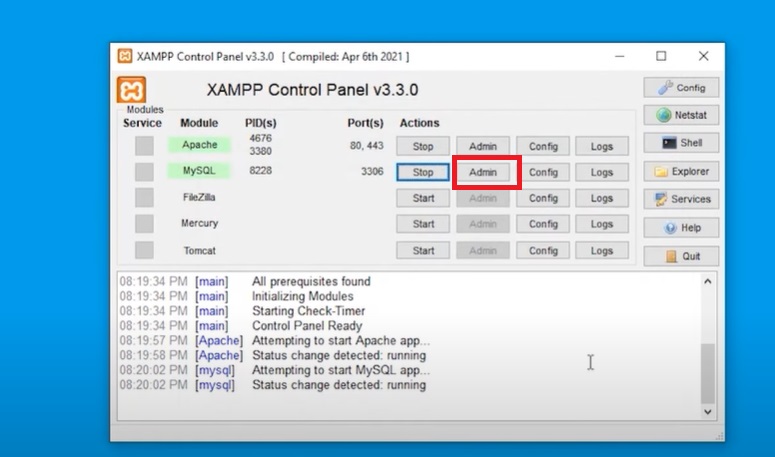
Click on the Admin button next to the MySQL module.
This will open phpMyAdmin in your web browser then click on “Database” tab to create a new database in localhost server, see the screenshot bellow

Enter a name for your new database in the Database Name field.
(Optional) Select a collation for your database.
Click on the “Create” button.
Your new database will be created. Now you have to create user account for admin, After that you can install wordpress on localhost server.
How to Create User Account On Localhost :
To create a user account on localhost server, Click on “Privileges” tab then click on “Add User Account” button, please check the screenshot bellow.
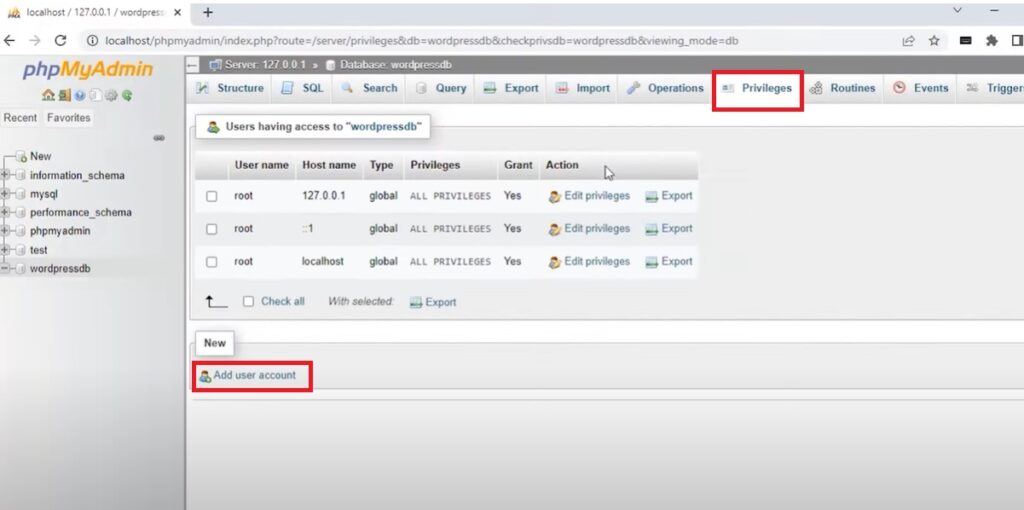
After that put username name and password in the filed, and Tick the database for that you creating the user account, please check the screenshot bellow.
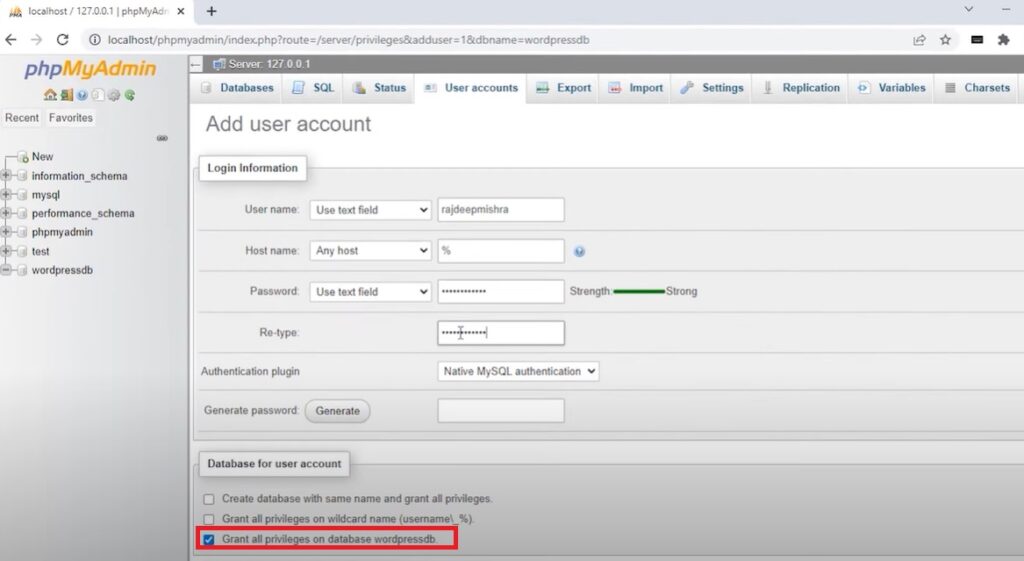
Please remember your username and password because you need used username and password to install wordpress on localhost server.
After that scroll down and click on “Go” button. Now you have successfully created user account on your localhost, now you are ready to install wordpress on localhost.
To install the wordpress on localhost please follow the bellow step.
How To Install WordPress on Localhost Server ( localhost/wordpress ):
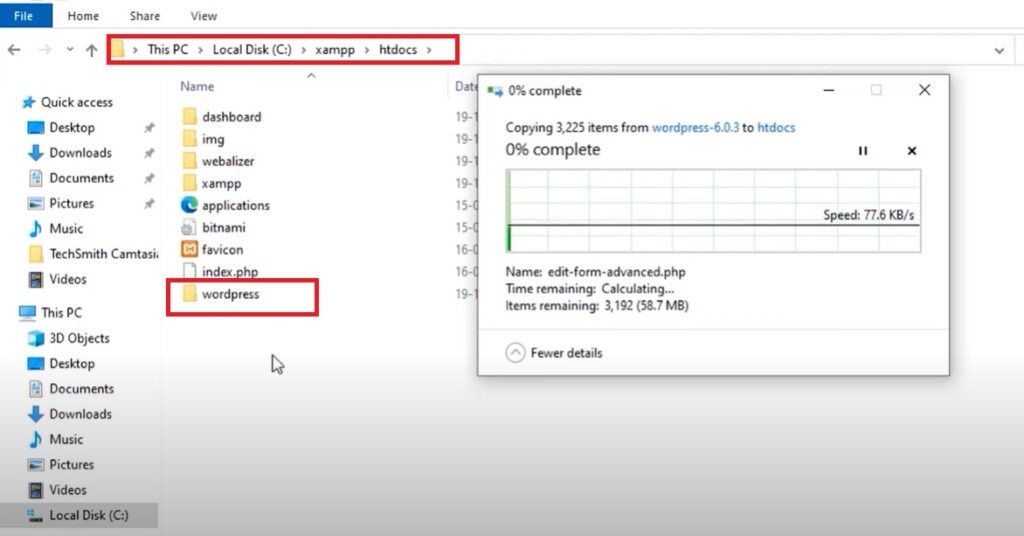
Now open your Local Disk (C:) (open other drive if you you install the XAMPP software on other drive).
Then find the “xampp” folder and open it. inside xampp folder you will see “htdocs” folder and open this folder.
Inside “htdocs” folder paste the folder that you extracted in step 2. please follow the screenshot
After that open your web browser and type “localhost/wordpress” then press enter.
Now you will see wordpress installation page, in this page select your language and click on “Continue” button.
Then click on “Lets Go” button. After that you will see a form for wordpress installation.
In the database field write the same name that you created in step 3.
For username and password write the same that you used to create user account

After write all details click on “submit” button, and then click on “Run The Installation” button.
After run the installation you will see a form where you have to write site title, username, password and email.
In the Site Title field wirte your site title.
Then enter a username and password for your wordpress login, this username and password is required when you login to wordpress dashboard.
In the email field write your email
After fill the all field click on wordpress install button.
Now you have successfully installed wordpress, now you can login to to your wordpress dashboard.
How To Login In Localhost WordPress Dashboard:
Login to your localhost wordpress dashboard is very easy, just open your browser and type localhost/wordpress/wp-admin and press enter.
Then you will see login page where you have to put your username and password then click on Login button
Read Also : How To Install WordPress On Hostinger
Here Some FAQs That Every People Ask:
Q: What is localhost?
Localhost is a computer term that refers to your own computer. When you type “localhost” into your web browser, you are essentially accessing a website that is hosted on your own computer.
Q: Why should I install WordPress on localhost?
There are several reasons why you might want to install WordPress on localhost. Here are a few:
To test out new themes and plugins before you install them on your live website.
To experiment with different settings and configurations without affecting your live website.
Q: What are some common problems with installing WordPress on localhost?
There are a few common problems that people encounter when installing WordPress on localhost. Here are a few:
The Apache or MySQL modules are not started in the XAMPP Control Panel.
The ports 80 and 443 are not open in your firewall.
The wp-config.php file is not configured correctly.
The WordPress installation wizard is not working properly.
If you are having problems installing WordPress on localhost, you can try the following:
Check to make sure that the Apache and MySQL modules are started in the XAMPP Control Panel.
Open your firewall and make sure that the ports 80 and 443 are open.
Check the wp-config.php file to make sure that it is configured correctly.
Try reinstalling WordPress.
If you are still having problems, you can ask for help in the WordPress forums or on the WordPress support site.
Q: What is the difference between localhost and a live website?
The main difference between localhost and a live website is that localhost is a website that is hosted on your computer, while a live website is a website that is hosted on a web server. This means that localhost is only accessible to you, while a live website is accessible to anyone who knows the address of your website.
Can I use my localhost WordPress installation for a real website?
Yes, you can use your localhost WordPress installation for a real website.
Few Things:
* Your localhost website will not be accessible to the public unless you make it accessible by forwarding port 80 on your computer to your localhost.
* Your localhost website will not be as fast as a website that is hosted on a web server.
* Your localhost website will not be as secure as a website that is hosted on a web server.
What are some other local server software options besides XAMPP and MAMP?
There are a few other local server software options besides XAMPP and MAMP:
* WAMPServer
* Mongoose
* Local by Flywheel
* Docker
Q: What are some other things I can do with my localhost WordPress?
Here are some other things you can do with your localhost WordPress installation:
- Test new themes and plugins.
- You can Build a staging environment for your wordpress website.
- Learn how to use WordPress.
- Troubleshoot problems with your WordPress website.
Q: How do I make my localhost WordPress installation accessible to the public?
To make your localhost WordPress installation accessible to the public, you need to forward port 80 on your computer to your localhost.
Open the Windows Firewall with Advanced Security.
In the left pane, click on Inbound Rules.
In the Protocol and Ports dialog box, select TCP and enter 80 in the Specific local ports field.
In the Profile dialog box, select Private and Public.
Click on Next.
Click on Finish.
Once you have forwarded port 80, you can access your localhost WordPress installation by entering the address http://localhost in your web browser.