
WebView is a powerful component in Android that allows you to load and display web pages within your application. This guide will walk you through creating a WebView in your Android app, including all necessary configurations and code snippets. By the end, you’ll have a fully functional WebView capable of loading webpages seamlessly.
Why Use WebView in Android?
WebView is ideal for integrating web content, such as displaying:
- Web-based content or applications.
- Dynamic content hosted online.
- HTML and CSS content within the app.
Let’s get started!
Prerequisites
Before implementing a WebView, ensure you have:
- Android Studio installed.
- Basic knowledge of Android development.
- An Android project ready to modify.
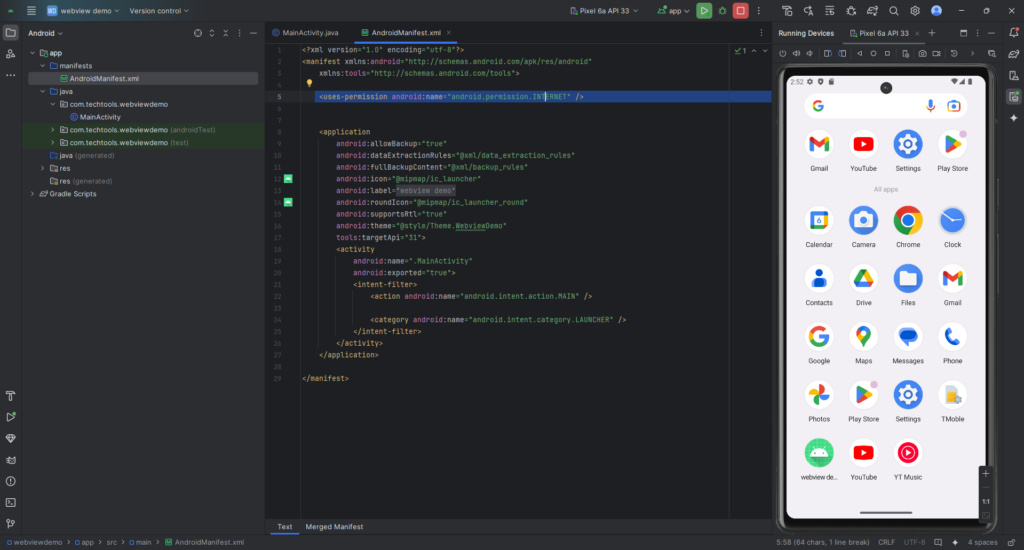
Step 1: Add Internet Permission
To allow the app to access the internet, add the following permission to your AndroidManifest.xml file:
<uses-permission android:name="android.permission.INTERNET" />
Step 2: Create the XML Layout
Define the layout for your activity. Include a WebView and a ProgressBar to indicate loading progress.
Read Also: How to Integrate Firebase Authentication with Google Sign-In in an Android App
res/layout/activity_main.xml
<?xml version="1.0" encoding="utf-8"?>
<RelativeLayout xmlns:android="http://schemas.android.com/apk/res/android"
    xmlns:tools="http://schemas.android.com/tools"
    android:layout_width="match_parent"
    android:layout_height="match_parent"
    tools:context=".MainActivity">

    <ProgressBar
        android:id="@+id/progressBar"
        android:layout_width="wrap_content"
        android:layout_height="wrap_content"
        android:layout_centerInParent="true"
        android:visibility="gone" />

    <WebView
        android:id="@+id/webView"
        android:layout_width="match_parent"
        android:layout_height="match_parent" />
</RelativeLayout>
Step 3: Write the Java Code
Here’s the complete implementation for your MainActivity.java. This includes WebView configuration, progress bar integration, and back navigation handling.
MainActivity.java
public class MainActivity extends AppCompatActivity {
private WebView webView;
private ProgressBar progressBar;

@SuppressLint("SetJavaScriptEnabled")
@Override
protected void onCreate(Bundle savedInstanceState) {
    super.onCreate(savedInstanceState);
    setContentView(R.layout.activity_main);

    // Initialize WebView and ProgressBar
    webView = findViewById(R.id.webView);
    progressBar = findViewById(R.id.progressBar);

    // Configure WebView settings
    WebSettings webSettings = webView.getSettings();
    webSettings.setJavaScriptEnabled(true);
    webSettings.setDomStorageEnabled(true); // Enable local storage
    webSettings.setLoadWithOverviewMode(true);
    webSettings.setUseWideViewPort(true);

    // Improve performance
    webSettings.setCacheMode(WebSettings.LOAD_CACHE_ELSE_NETWORK);
    webSettings.setAllowContentAccess(true);
    webSettings.setAllowFileAccess(true);

    // Handle WebView navigation
    webView.setWebViewClient(new WebViewClient());
    webView.setWebChromeClient(new WebChromeClient() {
        @Override
        public void onProgressChanged(WebView view, int newProgress) {
            // Show or hide the progress bar
            if (newProgress < 100) {
                progressBar.setVisibility(View.VISIBLE);
                progressBar.setProgress(newProgress);
            } else {
                progressBar.setVisibility(View.GONE);
            }
        }
    });

    // Load a webpage
    webView.loadUrl("https://www.google.com");
}

@Override
public void onBackPressed() {
    // Handle back navigation for WebView
    if (webView.canGoBack()) {
        webView.goBack();
    } else {
        super.onBackPressed();
    }
}
}
Step 4: Debugging Tips
If the WebView does not load the webpage:
- Verify the URL (e.g., use
https://www.example.com). - Check your internet connection.
Key Features of the Implementation
- JavaScript Enabled: Ensures modern websites load correctly.
- Progress Bar: Improves user experience by showing loading progress.
- Back Navigation: Allows users to navigate within the WebView history before exiting.
- Performance Optimization: Uses caching and enables local storage for better performance.
Conclusion
With this guide, you’ve successfully implemented a WebView in your Android application. This setup ensures a seamless and user-friendly experience for loading web content. Whether you’re displaying a website or integrating web-based features, this WebView implementation is a solid foundation for your Android project.
Happy coding!